- Home
- Shoulder Exercises
- Rotator Cuff Exs
Rotator Cuff Injury Exercises
Written By: Chloe Wilson BSc (Hons) Physiotherapy
Reviewed By: SPE Medical Review Board
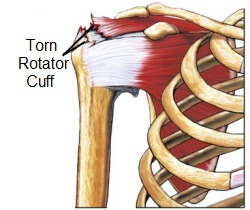
Rotator cuff injury exercises aim to restore strength and flexibility to the shoulder. The rotator cuff is a group of four muscles that surround the shoulder joint, like a cuff, and work together to move and stabilise the shoulder.
The two most common types of rotator cuff injury are:
- Tendonitis: where one of the rotator cuff tendons get inflamed
- Rotator Cuff Tear: where one of the tendons gets torn due to overuse or injury.
Both problems cause pain, weakness and stiffness in the shoulder, and rotator cuff injury exercises are vital to restore normal movement, strength and function.
In most cases, you can start rotator cuff injury exercises as soon as pain allows, but you should always consult your doctor or physical therapist first to check that the exercises are suitable and whether any further treatment is required.
How much you are able to do with a rotator cuff injury will depend on:
- the severity of the injury
- the severity of your symptoms - this doesn’t always correspond with the amount of injury
- how long it has been since your injury
- how restricted your strength and movement is
Related Article: Rotator Cuff Muscles - Anatomy & Function
Best Rotator Cuff Injury Exercises
Rotator cuff injury exercises will vary depending on what stage of rehab you are at. In the early days after a rotator cuff tear, the focus should be on controlling the pain and keeping the shoulder loose.
Here we will start with rotator cuff injury exercises that are suitable in the early stages of rehab, which you will find in three groups
- Pendulum Exercises: move the shoulder without using the rotator cuff
- Assisted Stretching Exercises: move the shoulder with minimal rotator cuff work
- Static Shoulder Strengthening: the best place to start with strengthening the rotator cuff after an injury
As the torn rotator cuff heals, you can move the shoulder through a greater range and start to do some more challenging shoulder rehab exercises.
1. Pendulum Exercises
Pendulum exercises are great rotator cuff injury exercises to start with. They get the shoulder joint moving, helping to reduce any stiffness but without requiring the muscles to actually work – the movement comes from your hips and legs, your arm simply follows the movement. As a result, they shouldn’t cause any pain. NB If you have back problems, do not do these pendulum exercises.
Shoulder Pendulum Exercises
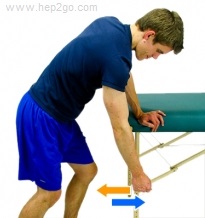
- Stand next to a table or chair and leaning forwards, rest the hand of your good arm on the table, letting your affected arm hang down, relaxed. Have one leg in front of the other in a lunge position
- Gently rock your body forwards and backwards, so that your affected arm swings forwards and backwards like a pendulum following the movement
- Spend around 1-2 minutes doing these in each direction, 2-3 times a day
- The further forwards you lean with pendulum exercises, the further forwards your affected arm will hang which will increase the stretch
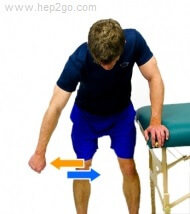
Variations: You can change the direction you rock your body to move the shoulder/arm in different directions
1. forwards and backwards as described above,
2. side to side and
3. in circles, clockwise then anticlockwise
Top Tips: 1. For the side to side and circle pendulum movements, have your feet side by side, hip distance apart, rather than in the lunge position described above.
2. By doing the pendulum exercises in all three directions, you work each of the different rotator cuff muscles
2. Assisted Stretching Exercises
With assisted rotator cuff injury exercises, you provide some support to the arm as you move it, so that the rotator cuff muscles don’t have to take the full weight of the arm. This allows you to move the shoulder further without pain than if there was no support.
You can also use simple equipment, such as a stick or towel to push/pull the arm so again it is moving but without the muscles having to fully initiate and control the movement.
Arm Lifts
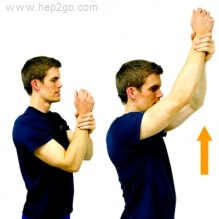
- Standing, sitting or lying down, support the weight of your affected arm underneath the elbow, with the elbow bent, or grasp the wrist
- Leading with your good arm, slowly lift the arm forwards and up as far as is comfortable and then slowly return to the starting position
- Repeat 10-20 times, 1-2 times a day
Progressions: 1. Hold the stretch for 3-5 seconds each time before returning to the starting position
2. Gradually reduce the amount of support provided by your good arm so the rotator cuff muscles start to do more of the work
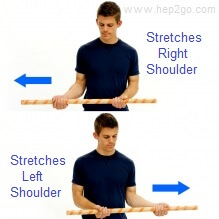
Shoulder Twist With Stick
- Sitting down, hold a light stick/broom/umbrella in both hands, elbows bent, palms facing the ceiling. Make sure the elbow of your affected arm is tucked in by your side and remains there during the exercise
- Push the stick out to the side horizontally, leading with your good arm, until you feel a stretch in the shoulder. Hold for 3-5 seconds
- Repeat 10-20 times, 1-2 times daily
Progression: Hold the stretch for longer as pain allows. As you increase the hold time, you can reduce the number of repetitions. You are aiming to holding for 30 seconds, at which stage you only need to perform 3-4 repetitions
Top Tips: 1. Some people find it easier to cup the end of the stick in their affected hand and perform the exercise. Whichever way works best for you, make sure you keep the wrist straight rather than allowing it to bend
2. Don’t let your body twist round – keep your hips pointing forwards. This is usually easier to do if you do the exercise in sitting rather than standing
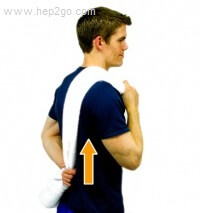
Towel Shoulder Stretch
- Standing upright, draw both shoulders back and take your hands back behind you. Grasp the wrist of your affected arm
- Gently draw your affected arm towards your opposite buttock and then if able up towards your opposite shoulder. Hold for 3 seconds and relax
- Repeat 10-20 times
Progression: 1. Hold the stretch longer aiming for 20-30 seconds (as above, as you increase the hold time, you can decrease the number of repetitions)
2,. After holding the stretch for a few seconds see if you can increase the stretch further
3. Drape a towel over your back with your good arm and grasp the bottom of the towel with your other hand. Slowly draw the towel forwards and upwards so that the hand on your affected arm slides up your back towards the opposite shoulder. Again, hold for a few seconds and repeat
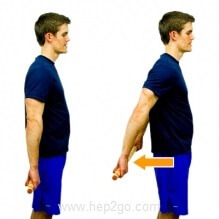
Reach Backs
- Stand, holding a stick in both hands behind your back, elbows straight, shoulders drawn back
- Leading with your good arm, take the stick back away from your body. Hold for 3-5 seconds
- Repeat 10-20 times, 1-2 times daily
Top Tips: Make sure you don’t bend forwards as you do this exercise – it may feel like you get more movement that way but the movement is actually coming from your upper back rather than your shoulder
Other Stretches That Can Help
As you start to make progress with your rotator cuff injury exercises and the initial injury begins to heal, you can start adding in some more challenging stretching exercises. But don't start too soon - you need to give the shoulder time to heal so you may need to wait 6-8 weeks after a rotator cuff injury before you start trying some of these stretches:
- Shoulder & Arm Stretches: for the rotator cuff, biceps & triceps muscles
- Trapezius Stretches: for the upper, middle and lower traps
- Upper Back Stretches: reduce pain and stiffness in the upper back
3. Static Strengthening Exercises For Rotator Cuff
When trying to increase muscle strength after an injury, the best place to start is with static rotator cuff injury exercises. These are exercises where the muscle contracts or works but without moving the arm. That way you can strengthen the muscles without over-stressing them.
The key thing to remember here is that the arm doesn’t move, but you will feel the muscle clenching.
Fist Wall Punch
- Stand, facing the wall. Bend you elbow at a right angle, make a fist and place your knuckles against the wall (you can place a towel between your fist and the wall to make it more comfortable)
- Keeping your body and arm still, gently push your fist forwards into the wall, feeling the muscles at the front of your shoulder clench. Hold for 3-5 seconds
- Repeat 10-20 times, 1-2 times daily
Elbow Wall Punch
- Stand with your back against the wall, elbow bent at a right angle, resting on the wall (you can place a towel between your elbow and the wall)
- Gently push your elbow back against the wall feeling the muscles at the back of your shoulder start to clench. Hold for 3-5 seconds
- Repeat 10-20 times, 1-2 times daily
Static Abduction
- Stand sideways, parallel to a wall. Bend your elbow to a right angle and let it rest against the wall (use a towel for cushioning if you want to)
- Gently push your elbow into the wall feeling the muscles on the side of your shoulder and upper arm clench. Hold for 3-5 seconds
- Repeat 10-20 times, 1-2 times daily
Static External Rotation
- Stand sideways, parallel to a wall. Bend your elbow to a right angle and rest the back of your hand against the wall (you can use a folded towel for cushioning)
- Gently push the back of your hand into the wall and feel the muscles around the back and side of your shoulder clench. Hold for 3-5 seconds
- Repeat 10-20 times, 1-2 times daily
Static Internal Rotation
- Stand in a door way (door open) with your elbow bent at a right angle and position yourself so that your palm rests against the door frame
- Gently press your hand against the door frame. Hold for 3-5 seconds
- Repeat 10-20 times, 1-2 times daily
Top Tips
With each of these static rotator cuff injury exercises, you can choose how much force you push with. Start very gently and gradually build up. You will most likely find some directions easier than other, depending on which part of the rotator cuff is injured. You may notice a mild aching in your shoulder after doing these static exercises, which is a result of the muscles working, but that should settle down quickly.
Remember, your body, wrist and arm should all remain still with each of these static rotator cuff exercises – you are looking to clench the muscles, not move the arm.
As your rotator cuff injury heals, you can progress on to more challenging strengthening exercises, but only once you can do these static exercises without any increase in your symptoms.
It is really important to regain full strength in the rotator cuff to ensure normal function in the shoulder and to reduce the risk of further injuries, so when you are ready check out these rotator cuff strengthening exercises.
How To Exercise Safely
Rotator cuff injury exercises are a really important part of rotator cuff tear treatment, but they should be performed carefully to ensure no further damage is done, particularly with a rotator cuff tear. Any new incidence of shoulder pain that doesn’t settle within a few days should be evaluated by doctor who may advise a course of physical therapy.
The exercises here are typical rotator cuff physical therapy exercises and it is important to get a physical therapist to check you are performing them correctly.
It is important not to push in to pain with rotator cuff injury exercises, particularly in the early stages as this can cause more damage to the tendons. As the rotator cuff injury heals, you will be able to begin gently nudging into the pain in order to stretch out any areas of tightness and to improve muscle strength, but any pain should subside within around 30 minutes of stopping rotator cuff injury exercises. If you are still noticing ill-effects a couple of hours later, you most likely overdid things so reduce the number of repetitions, or the amount of resistance used.
Progressing Rotator Cuff Injury Exercises
All of these rotator cuff injury exercises are great to do in the early stages following a shoulder injury or the development of tendonitis or bursitis.
After a couple of weeks, you should be ready to start some more challenging exercises where you get the muscles to initiate the movement, rather that following it so as to gain more strength and movement at the shoulder. So when you feel ready, check out these:
- Shoulder Exercise Guide: find the right exercises for you
- Shoulder Rehab Exercises: strengthen the rotator cuff
- Scapular Stabilization Exercises: for shoulder blade stability
- Shoulder Mobility Exercises: improve shoulder range of motion
- Shoulder & Arm Stretches: stretch the different muscles around the shoulder
- Shoulder Impingement Exercises: for impingement syndrome
If you want to find out more about the rotator cuff and other treatment methods, visit the torn rotator cuff section.
Page Last Updated: 30/03/2022
Next Review Due: 30/03/2024
